How To Format A Thumb Drive For Osx
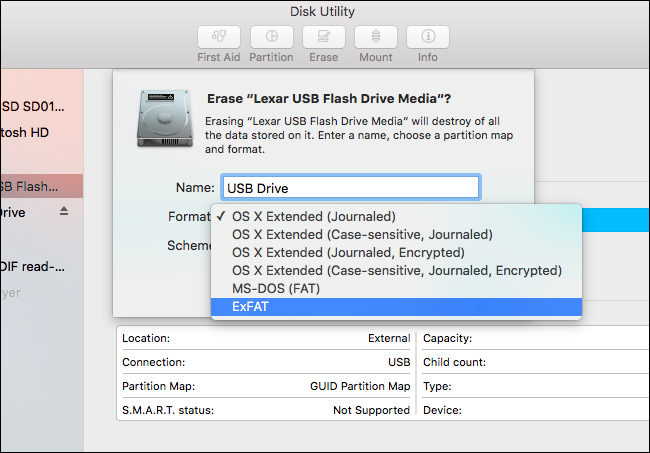
Macs read and write to a different format, called HFS+. Another format, called FAT32 is compatible with both OS platforms. Here's a look at how the different HD format types function Now playing: Watch this: Format a drive for Mac OS X and Windows. To format a USB Flash Drive to FAT32 in Mac OS X follow the next steps. Connect the USB Fash Drive to the Mac OS X computer. Search for Disk Utility in Launchpad and open it. Select the Drive and click Erase. Enter the new name (OPTIONAL). Select MS-DOS(FAT) for Format.
To set up your Outlook client to work with Gmail If you've entered everything in correctly, task will be completed successfully and you can close out of the window and begin using your account via Outlook 2011 mac. :max_bytes(150000):strip_icc()/et080202_1-56a282c65f9b58b7d0cb79ca.png "Set up outlook 2010 for gmail") Gmail’s Web interface is one of the best, but it’s common to use Outlook to sync email and calendars as well, especially at work. And while Gmail is notoriously unfriendly with email clients like Outlook, with a few tweaks the two can play nicely with one another. Here’s how to set up your Gmail account.
Gmail’s Web interface is one of the best, but it’s common to use Outlook to sync email and calendars as well, especially at work. And while Gmail is notoriously unfriendly with email clients like Outlook, with a few tweaks the two can play nicely with one another. Here’s how to set up your Gmail account.
Maybe you just want to completely delete data on your Mac hard drive. Maybe you need to format a hard drive so that it can be used on your MacBook Air and extend your Mac's storage. To achieve this, you're lucky to find this article which focus on how to format hard drive on Mac.
Steps to format hard drive on Mac You can follow the steps below to format hard drive on Mac. Before you start formatting hard drive on Mac, make sure you have backed up the Mac hard drive, especially when you get valuable files on the hard drive. If you've no idea how to back up Mac, check. • 1) To format external hard drive for Mac, connect it to one of the ports on your Mac. Turn the drive on, and make sure it appears in the Finder. If it's the Mac's internal hard drive, of course there's no need to connect.

• If the drive is internal, it should already show up in the Finder. If not (for example, if you installed a new drive that hasn't yet been formatted), look for it in Disk Utility in the next couple steps. • If you have already written data to the drive, back it up before proceeding to the next step.
• 2) In your Mac's Finder, choose Go > Utilities. The /Applications/Utilities folder will open. Then launch Disk Utility. • 3) Click the Erase tab if it's not already selected.
At the bottom of the window, you'll see some information about the drive you have selected. Look at the Partition Map Scheme entry. • If it says GUID Partition Table, you can format the drive by selecting Mac OS X Extended (Journaled) in the Format pop-up menu, giving the drive a name, and then clicking Erase and you've successfully formatted Mac hard drive. • If the Partition Map Scheme says Master Boot Record or Apple Partition Map, you need to continue to the next step. • 4) Click the Partition tab if it's not already selected. In the Partition screen, click the Partition Layout pop-up menu and select the number of partitions you want. (As most people use hard drive as one partition, we'll regard this partition as your hard drive.) Under Partition Information, enter a name for the partition—with a single partition, this is simply the name of the drive.
In the Format pop-up menu, choose Mac OS Extended (Journaled). • 5) Then look at the graphical partition display in the middle of the window. Select the partition you just configured, and then click the Options button. In the sheet that appears, select GUID Partition Table and click OK.
This makes sure your drive can be used to boot a Mac. • 6) Check your settings and if all is OK, click Apply. You get one last warning to confirm that you really want to format the drive.
If so, click Partition. And you've done with formatting Mac hard drive. As for now you must know how to format drive on Mac computer by yourself. If you realize that valuable files are formatted on the hard drive but you haven't backed up the hard drive, get to recover formatted data for you before the data is overwritten. Added Info In the above guide, we use Disk Utility to erase and format a hard drive. Disk Utility is a free application included with Mac OS X, is a multipurpose, easy-to-use tool for working with hard drives and drive images. Among other things, Disk Utility can erase, format, repair, and partition hard drives, as well as create RAID arrays.